Securely Connecting Your Remote IoT Devices To A VPC With Raspberry Pi: A Free Windows Guide
Diving into the World of Secure IoT and Cloud Networking
If you're reading this, chances are you're diving headfirst into the world of IoT (Internet of Things) and cloud networking. As technology advances, securely connecting remote IoT devices through a Virtual Private Cloud (VPC) using Raspberry Pi has become a crucial aspect of modern networking. It’s not just about getting your gadgets to talk; it’s about ensuring that communication is private, reliable, and secure. Connecting remote IoT devices securely has become increasingly important as more businesses and individuals rely on connected devices for various purposes. From smart homes to industrial sensors, the data flowing through these devices can be sensitive, making robust security measures non-negotiable. This article will walk you through the process of securely connecting remote IoT devices within a VPC using a Raspberry Pi, while also providing free resources for Windows users to manage this setup. In this article, we’ll dive deep into how to set up a secure IoT VPC environment using Raspberry Pi, including how you can leverage your Windows PC for management, utilizing free tools and resources available (legally, of course). If you're looking to securely connect your Raspberry Pi to a VPC and manage IoT devices remotely, this guide will walk you through the process step by step. By the end of this guide, you will have a comprehensive understanding of the steps required to establish a secure IoT environment.Why Secure IoT Connections Matter
In today's interconnected world, IoT devices are ubiquitous. They collect vast amounts of data, often from sensitive environments, and transmit it over networks. Without proper security, this data can be intercepted, altered, or used maliciously. A Virtual Private Cloud (VPC) provides an isolated network environment within a public cloud, giving you greater control over your network topology, IP addressing, and security configurations. When you combine this with the low-cost, versatile Raspberry Pi, you get a powerful, yet affordable, solution for deploying and managing remote IoT devices securely. This approach allows you to securely connect your remote IoT VPC Raspberry Pi, providing a solid foundation for your IoT endeavors. It ensures that your devices communicate only within your defined private network, minimizing exposure to the public internet and potential threats.Getting Started: What You'll Need
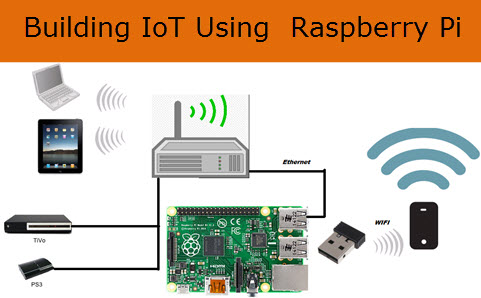
Before we break it down step by step, let's gather the essentials. The beauty of this setup is that it emphasizes the availability of free tools and resources that can help you achieve this setup without incurring additional costs. Here’s what you’ll need:- A Raspberry Pi (any recent model like Raspberry Pi 3B+, 4, or Zero 2 W will work).
- A microSD card (at least 16GB, class 10 recommended).
- A reliable power supply for your Raspberry Pi.
- An Ethernet cable or Wi-Fi connectivity for your Raspberry Pi.
- A Windows PC (this will be your management workstation).
- An internet connection.
Step-by-Step Guide: Securely Connecting Your Raspberry Pi to a Remote IoT VPC
Alright, let’s break it down step by step. The following are the steps to securely connect your Raspberry Pi to a remote IoT VPC using Windows.Step 1: Preparing Your Raspberry Pi
The first step in securely connecting remote IoT VPC Raspberry Pi is to configure your Raspberry Pi. This involves installing its operating system and performing some initial setup.- Download Raspberry Pi OS: Begin by downloading the latest version of Raspberry Pi OS (formerly Raspbian) from the official Raspberry Pi website. Choose the "Lite" version if you prefer a headless setup (no desktop environment), which is often sufficient for IoT applications and uses fewer resources.
- Flash the OS to your microSD card: Use a tool like Raspberry Pi Imager (also available for free from the official website) to flash the downloaded OS image onto your microSD card. This tool makes the process straightforward.
- Enable SSH (Optional but Recommended): For headless setups, enabling SSH (Secure Shell) is crucial for remote access. You can do this by creating an empty file named `ssh` (no extension) in the boot directory of the flashed microSD card before inserting it into the Raspberry Pi.
- Initial Boot and Configuration: Insert the microSD card into your Raspberry Pi and power it on. Connect it to your network. If you enabled SSH, you can find its IP address from your router's connected devices list or by connecting it to a monitor and keyboard initially. Then, use an SSH client on your Windows PC (like PuTTY or the built-in OpenSSH client in PowerShell/CMD) to connect. Change the default password immediately for security.
Step 2: Setting Up Your Windows Environment for Remote Management
Your Windows PC will serve as the central hub for managing your Raspberry Pi and IoT devices. While a full Windows operating system isn't "free" in the traditional sense for general use, you can legally obtain evaluation versions for testing or utilize free tools *on* your existing Windows installation to manage your IoT setup. The phrase "downloading windows 10 files" in the context of free resources often refers to development tools, SDKs, or specific IoT-focused Windows versions like Windows IoT Core (which has free licensing for certain use cases). For this guide, we'll focus on leveraging free tools available on a standard Windows installation.- Install Virtualization Software (Optional, for advanced setups): Download and install virtualization software like VirtualBox or VMware Workstation Player on your Windows PC. While not strictly necessary for basic Pi management, this can be useful if you plan to run virtual machines for specific IoT development or testing environments that require a Windows server or client OS.
- Install Essential Tools:
- SSH Client: If you're on Windows 10/11, OpenSSH client is often pre-installed and can be used via PowerShell or Command Prompt. Alternatively, download PuTTY, a free and popular SSH client.
- SFTP Client: For secure file transfer, WinSCP (free) is an excellent choice that integrates well with PuTTY.
- Network Scanner: Tools like Advanced IP Scanner or Angry IP Scanner can help you find your Raspberry Pi's IP address on your network.
- Code Editor: Visual Studio Code (VS Code) is a free, powerful, and highly extensible code editor from Microsoft, perfect for developing IoT applications and managing files remotely via SSH extensions.
Step 3: Establishing the VPC Connection
This is where the "VPC" part comes into play. You'll typically set up your VPC in a cloud provider like AWS, Azure, or Google Cloud. The Raspberry Pi will then connect to this VPC, often via a VPN (Virtual Private Network) tunnel, to ensure secure communication.- Set up Your VPC in a Cloud Provider: Create a VPC in your chosen cloud provider. Configure subnets, route tables, and security groups. This is a crucial step to define your isolated network.
- Configure a VPN Server (e.g., OpenVPN, WireGuard) within Your VPC: Deploy a small virtual machine or a managed VPN service within your VPC. This server will act as the gateway for your Raspberry Pi to securely connect to your private cloud network.
- Install VPN Client on Raspberry Pi: On your Raspberry Pi, install the corresponding VPN client software (e.g., OpenVPN client, WireGuard client).
- Generate and Transfer VPN Configuration: Generate the client configuration file from your VPN server and securely transfer it to your Raspberry Pi using SFTP.
- Connect Raspberry Pi to VPC via VPN: Activate the VPN client on your Raspberry Pi using the configuration file. Once connected, your Raspberry Pi will have an IP address within your VPC's private range, and all its traffic to other resources within the VPC will be securely tunneled. This approach allows you to securely connect your remote IoT VPC Raspberry Pi, providing a solid foundation for your IoT endeavors.
Step 4: Remote IoT Device Management
With your Raspberry Pi securely connected to your VPC, you can now manage it and any attached IoT devices remotely from your Windows PC.- SSH for Remote Control: Use your SSH client (PuTTY or PowerShell) to connect to your Raspberry Pi's private IP address within the VPC. From here, you can execute commands, install software, and manage your IoT applications. Mastering SSH login for IoT is fundamental for efficient remote management.
- SFTP for File Management: Use WinSCP to securely transfer files between your Windows PC and your Raspberry Pi. This is essential for deploying new code, configuration files, or retrieving data logs.
- IoT Application Deployment: Deploy your IoT applications (e.g., Python scripts, Node.js applications) onto the Raspberry Pi. These applications can then interact with sensors, actuators, or other devices connected to the Pi, sending data securely through the VPC.
- Monitoring and Logging: Set up logging and monitoring tools on your Raspberry Pi and within your VPC to keep an eye on device health, data flow, and potential issues.
The Power of Free Resources
The concept of securely connecting remote IoT VPC Raspberry Pi download free also highlights the availability of free tools and resources that can help you achieve this setup without incurring additional costs. From the Raspberry Pi OS itself to various open-source VPN solutions, SSH clients, and development environments, a robust and secure IoT setup doesn't have to break the bank. Leveraging these free tools empowers you to experiment, learn, and deploy sophisticated IoT solutions efficiently.Best Practices for Ongoing Security
Establishing the connection is just the first step. Maintaining security is an ongoing process.- Regular Updates: Always keep your Raspberry Pi OS and all installed software up to date. This ensures you have the latest security patches.
- Strong Passwords and SSH Keys: Use strong, unique passwords and, ideally, switch to SSH key-based authentication for your Raspberry Pi for enhanced security.
- Minimal Software: Install only the necessary software on your Raspberry Pi to reduce the attack surface. Regularly clean up unnecessary files and applications.
- Firewall Rules: Configure strict firewall rules on your Raspberry Pi and within your VPC security groups to allow only essential traffic.
- Monitoring: Implement monitoring for unusual activity or failed login attempts.
- Stay Informed: Stay informed about the latest security threats and best practices in IoT and cloud security.
Conclusion
In conclusion, mastering remote IoT VPC connections on Raspberry Pi and leveraging your Windows PC for management is a powerful skill for anyone in the IoT space. By following the steps outlined in this article, you’ll be well on your way to creating a secure and efficient IoT setup. By implementing the steps outlined in this guide and staying informed about the latest security threats and best practices, you can confidently deploy and manage your remote IoT devices within a secure VPC environment. And there you have it—a comprehensive guide on how to securely connect your remote IoT VPC Raspberry Pi and get it all set up on Windows for free, utilizing readily available tools and resources. By the end of this guide, you’ll have a comprehensive understanding of how to securely connect remote IoT VPC Raspberry Pi and manage it effectively from your Windows workstation.
Securely Connect Remote IoT P2P SSH Raspberry Pi Free Server

How To Securely and Directly Connect Raspberry Pi with RemoteIoT P2P
Building The (Internet of Things) IOT Using Raspberry Pi
